自己动手造无限循环图片轮播
代码示例:https://github.com/johnlui/Swift-On-iOS/tree/master/BuildAnInfiniteCarousel/BuildAnInfiniteCarousel
环境要求:Xcode 7.0+ / Swift 2.0+
本篇文章中,我将跟大家一起动手构造一个非常常见的无限循环的图片轮播功能。
目标
我们的目标是打造一个支付宝这样的无限循环图片轮播:图片占满屏幕宽度,底部居中有小点点指示位置。

搭建界面
准备工作
新建一个名为 BuildAnInfiniteCarousel 的单页面项目,拖进去四张尺寸一样的素材图片,下面我们开始搭建页面。
添加 Scroll View
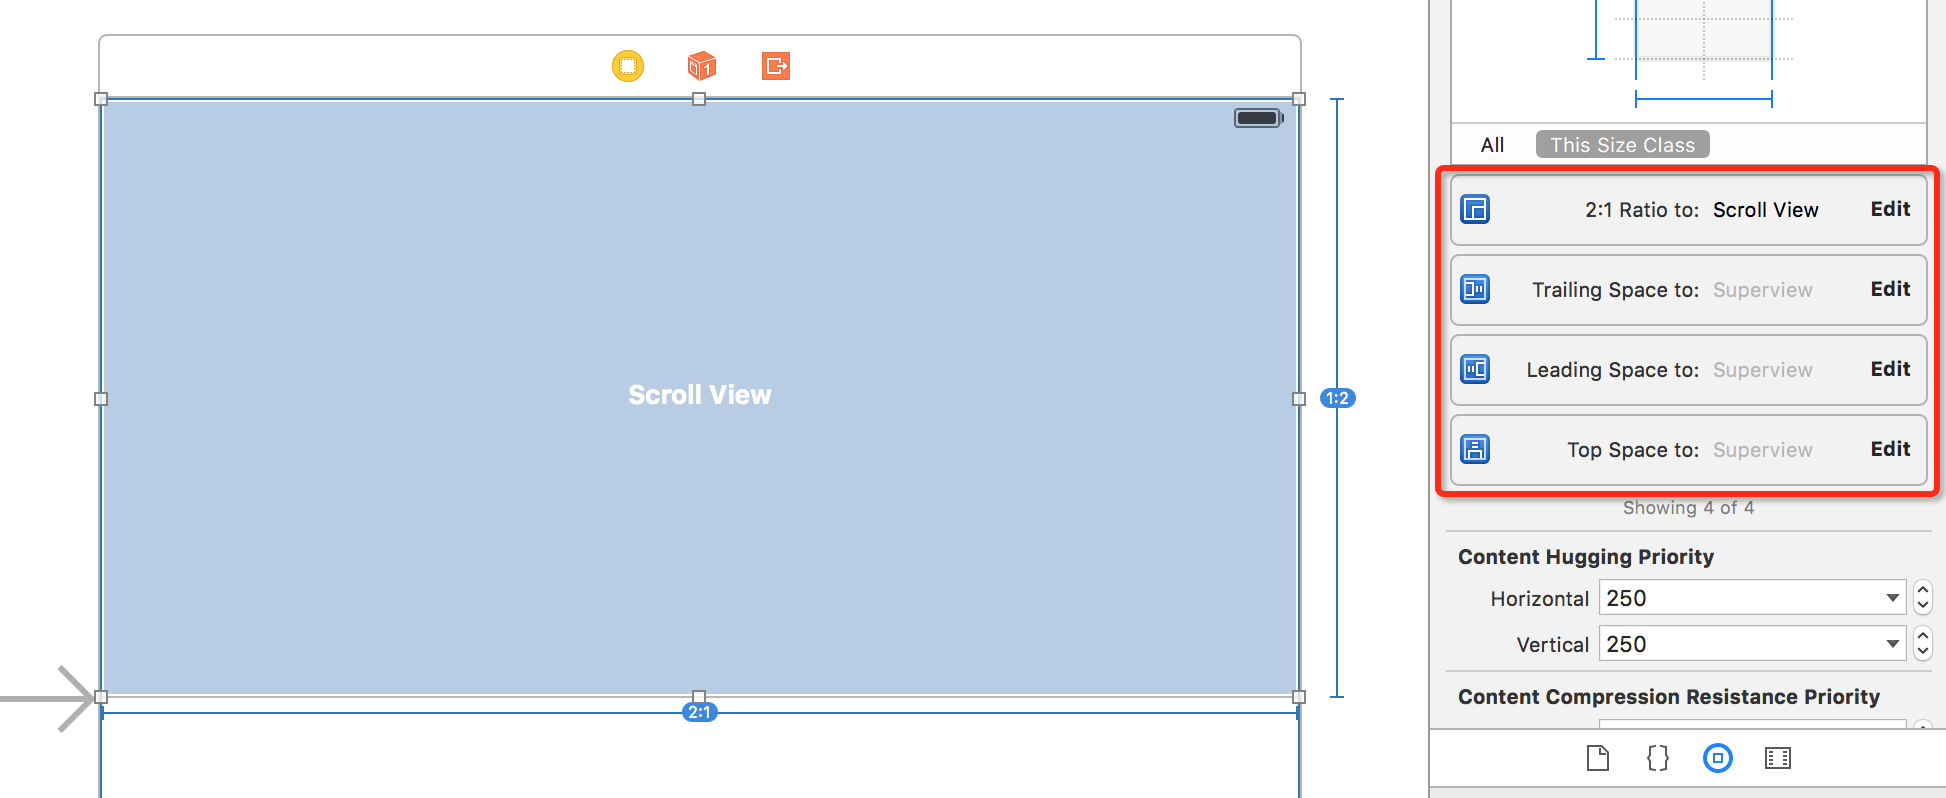
拖动一个 Scroll View 添加到页面顶端,设置宽高比为 2:1,使用 Auto Layout 确定其位置:
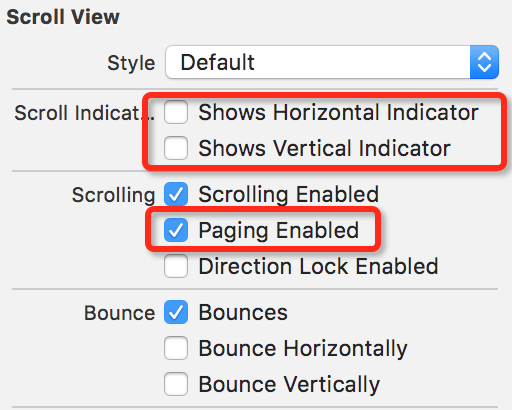
勾选掉“显示滚动条”,勾选上 Paging Enabled 以实现自动停靠:
添加 Page Contro
拖动一个 Page Control 组件添加到页面上,悬浮到 Scroll View 上方,此处的 Auto Layout 约束大家自由发挥。将 Page Control 的 pages 总数设置为 4。
实现思路
无限轮播
无限轮播其实只是一个欺骗。如果我们有四张图片需要显示,编号1、2、3、4,那么我们只需要放上四张图片,再在前面放一张 4 号图,在最后放一张 1 号图,在用户滚动到最前或者最后的时候,不声不响地将列表回滚到中间的 1、4 号图,在用户看来是一直在朝一个方向滚动,实际上在中间我们神不知鬼不觉的把列表往回滚到了特定位置。
指示位置的小点点
这个很容易想到,使用 Scroll View Delegate,检测滚动距离,改变 currentPage 即可。
开始编码
绑定 UI 元素到 View Controller
分别右键(或者按住 Ctrl)绑定 Scroll View 和 Page Control 到 View Controller,此处不再上图。
插入图片
我们先做有限的图片轮播。在 viewDidLoad 中使用代码给 Scroll View 插入四张图片:
let width = UIScreen.mainScreen().bounds.width
let height = width/2

for i in 0...3 {
    let iv = UIImageView(frame: CGRectMake(width * CGFloat(i), 0, width, height))
    iv.image = UIImage(named: "pic\(i+1)")
    iv.contentMode = UIViewContentMode.ScaleAspectFill
    iv.clipsToBounds = true
    iv.userInteractionEnabled = true
    self.scrollView.addSubview(iv)
}
self.scrollView.contentSize = CGSizeMake(width * 4, height)
运行,此时已经得到了可以自动停靠的四张图片的轮播了。
指示位置的小点点联动
根据上面提到的思路,使用以下代码实时计算小点点的 currentPage:
class ViewController: UIViewController, UIScrollViewDelegate {
... ...
func scrollViewDidScroll(scrollView: UIScrollView) {
    if scrollView == self.scrollView {
        let currentPage = scrollView.contentOffset.x / UIScreen.mainScreen().bounds.width + 0.5
        self.pageControl.currentPage = Int(currentPage)
    }
}
建议采用以前分享过的 可视化方法 将 Scroll View 的 delegate 设置成当前 View Controller。
至此,有限图片轮播已经完成。
跨越到无限轮播
增加第 0 张和第 5 张图片
增加 for 循环的上限到 5,修改图片加载逻辑,给 Scroll View 设置一个初始的 offset 值:
for i in 0...5 {
    let iv = UIImageView(frame: CGRectMake(width * CGFloat(i), 0, width, height))
    var picName = "pic"
    switch i {
    case 0:
        picName += "4"
    case 5:
        picName += "1"
    default:
        picName += i.description
    }
    iv.image = UIImage(named: picName)
    iv.contentMode = UIViewContentMode.ScaleAspectFill
    iv.clipsToBounds = true
    iv.userInteractionEnabled = true
    self.scrollView.addSubview(iv)
}
self.scrollView.contentSize = CGSizeMake(width * 6, height)
self.scrollView.contentOffset = CGPointMake(width, 0)
不声不响地滚动
同样是在 scrollViewDidScroll 里面操作:
func scrollViewDidScroll(scrollView: UIScrollView) {
    if scrollView == self.scrollView {
        let width = UIScreen.mainScreen().bounds.width
        let offsetX = scrollView.contentOffset.x

        if offsetX == 0 {
            scrollView.contentOffset = CGPointMake(width * CGFloat(4), 0)
        }
        if offsetX == width * CGFloat(4 + 1) {
            scrollView.contentOffset = CGPointMake(width, 0)
        }

        let currentPage = scrollView.contentOffset.x / width + 0.5
        self.pageControl.currentPage = Int(currentPage)
    }
}
解决小点点错了一位的问题
将 + 0.5 改成 - 0.5 即可:
let currentPage = scrollView.contentOffset.x / width - 0.5
搞定!
查看成果

后话
如果需要复用,单独用 xib 或者 StoryBoard 实现即可,思路完全一致。


发表评论: